- Creating your first app in Salesforce is a great way to get hands-on experience with the platform. Salesforce makes it easy to build custom apps that can be tailored to your business needs without writing any code.
Step 1: Log in to Salesforce
1. Go to https://login.salesforce.com and enter your credentials.
2. If you don’t have an account, you can create a free Developer Edition at https://developer.salesforce.com/signup.
Step 2: Switch to Lightning Experience
1. Make sure you're in the Lightning Experience UI (modern interface).
2. Click on your avatar in the top right corner and choose Switch to Lightning Experience if you’re in Classic.
Step 3: Navigate to App Manager
1. Click the Gear Icon (Setup) in the top right.
2. Select Setup.
3. In the Quick Find box, type App Manager.
4. Click App Manager under Apps.

Step 4: Create a New App
1. Click New Lightning App at the top-right.
2. Fill in the App Details:
3. App Name: e.g., "My First App"
4. Developer Name: auto-filled based on the App Name
5. Description: (optional)
Click Next.
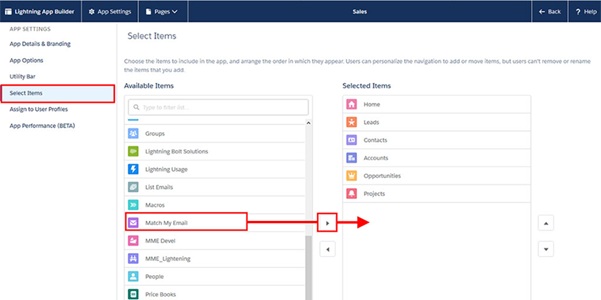
Step 5: Add Navigation Items
1. Choose which items (tabs) to include in the app.
2. Common options:
3. Accounts
4. Contacts
5. Opportunities
6. Custom Objects you may create
Click Next
Step 6: Assign User Profiles
1. Choose which profiles can access the app.
2. For testing, you can select System Administrator.
Click Save & Finish.
Step 7: Launch the App
1. Go to the App Launcher (grid icon in the top-left).
2. Search and select your app by name (e.g., "My First App").
Congratulations! You’ve just created your first custom app in Salesforce.
Optional Next Steps
1. Create Custom Objects and Fields.
2. Use Flows to automate processes.
3. Add Reports and Dashboards.
Tips:
1. Use Salesforce Trailhead modules for guided learning.
2. Keep your app name relevant to its purpose.
3. Use permission sets and profiles to control access.