In Microsoft Dynamics 365, the command bar (ribbon) provides users with quick access to key actions such as creating records, assigning ownership, activating or deactivating records, and more. While these out-of-the-box (OOB) buttons are helpful, business processes often demand tailored functionality. This is where the Ribbon Workbench becomes a powerful tool for extending and customizing the standard user experience.
For example, you might want to limit certain actions to specific security roles, ensuring that only authorized users can perform them. In other cases, you may choose to add a confirmation prompt before deactivating a record to prevent accidental changes. You can integrate custom logic or Power Automate flows, or you could even replace the default Assign button with a custom version that runs additional business validation before updating ownership. These kinds of enhancements help tailor Dynamics 365 to match your organization’s operational and compliance needs.
This article walks you through:
Understanding why customizing out-of-the-box buttons can improve usability and enforce business logic in Dynamics 365.Creating a simple JavaScript rule to control button visibility based on user security roles. Customizing the Qualify button on the Lead entity step-by-step using Ribbon Workbench. Publishing and testing your changes to confirm that the button behaves as expected for different user roles
Prerequisites
Before you start customizing OOB buttons, ensure you have:
1. System Administrator or System Customizer security role.
2. Ribbon Workbench installed (either via XrmToolBox or as a solution).
3. A solution containing the target entity (e.g., Contact, Account, Lead).
Note: Ribbon Workbench solutions can contain only entity components and should not contain more than 5 entities.
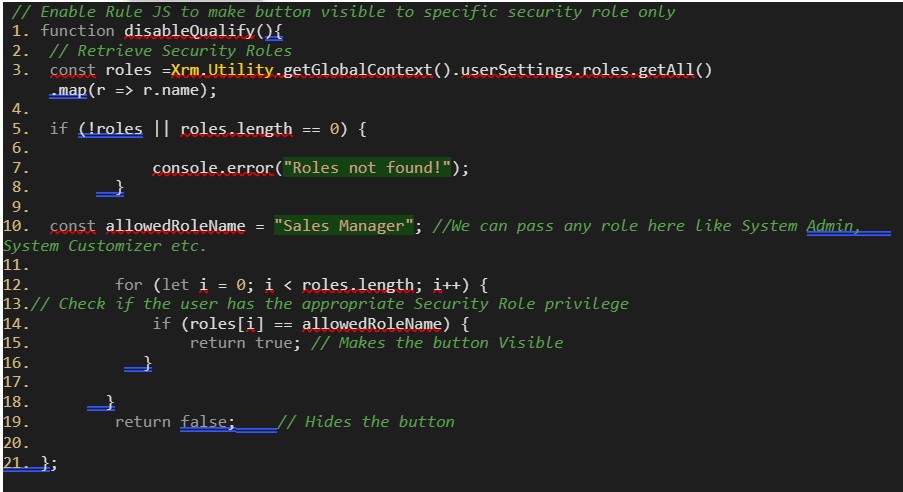
In this blog we will hide the Qualify Button on the Lead Entity for users lacking a Sales Manager security role.
Create a web resource:
Create a web resource with the following JavaScript in default solution or any other solution.

Customizing the Button
Let’s take an example of customizing the Qualify button on the Lead entity.
Step 1: Create a Solution
Create a new solution and add your entity without any components.
Step 2: Launch Ribbon Workbench
Launch the Ribbon Workbench from Settings > Advance Settings > Customizations > Ribbon Workbench.

Open the Solution contains the Lead entity.
Step 3: Locate the Button and make it Customizable
In the Ribbon Workbench interface:
1. Select the Lead entity.
2. Locate the Qualify button under the Form Command Bar and scrolling the horizontal scrollbar.
3. Right click on the Qualify button and click on Customize Button and then Customize Command options to make this button customizable.

Step 4: Customize the button and its command
1. Add a new Enable rule with the following configurations.
2. Set the default to false to hide the button for all users except for those having an appropriate Security Roles.

Add this enable rule in the existing command of the Qualify button.
Step 5: Publish the Changes
Once the customization is complete, click Publish in Ribbon Workbench to apply your changes to Dynamics 365.
6. Testing the Customization
After publishing:
1. Open a Lead record in Dynamics 365.
2. Click the Qualify button.
3. Verify that the Qualify button appears only for users having appropriate security role and hides for the users lacking this security role.

Notice that the Qualify button is hidden from the user lacking the Sales Manager security role.
Conclusion
Customizing out-of-the-box buttons in Microsoft Dynamics 365 enables organizations to align the application interface with their unique business needs. Using Ribbon Workbench , these customizations can be performed efficiently and safely without modifying core system code.
Whether you’re adding business validations, integrating Power Automate flows, or simply improving user experience, mastering Ribbon Workbench customization is an essential skill for every Dynamics 365 professional.